
Given my collection of hardware and sensors going unused, I decided to scrap together a new mobile robot with as many sensors as possible. The ultimate goal is to build a bot capable of doing autonomous navigation using Slam. I decided to build on top of my Jetbot which had a 4 GB Jetson Nano. When building a bot mostly from scratch I learned a lot more about hardware and firmware.
Choosing a power supply
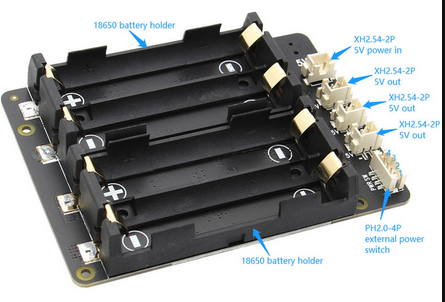
Before adding more I had to determine my power requirements. The Jetbot originally came with a power supply that took three 18650 batteries but it only had one 5V pin and that was for powering the Jetson itself.

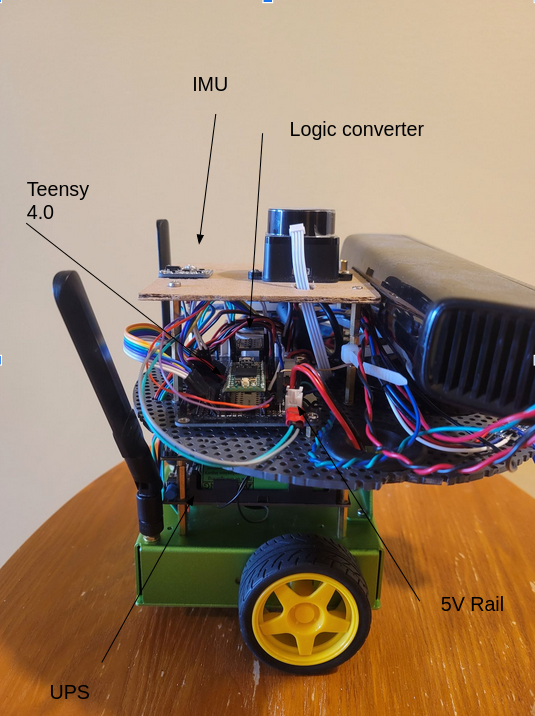
I decided to go with a Geekworm Jetson UPS power supply which cost $65. This UPS takes four 18650 batters, has plenty of extra 5V rails and can handle up to 8 amps of current. Given the Jetson takes a max of 3A this hopefully will power all my other sensors and hardware. I’ve noticed on other projects that if a sensor does not get the current it requires, it will start behaving in very strange ways!
Choosing motors
The motors that came with my Jetbot simply would not suffice as they did not have encoders. I chose these fairly cheap motors from aliexpress which should be accurate enough for reading wheel rotations and dead reckoning the robot. This mention of the pull of shaping in the description I didn’t understand at first but I will go more into detail in my next post.
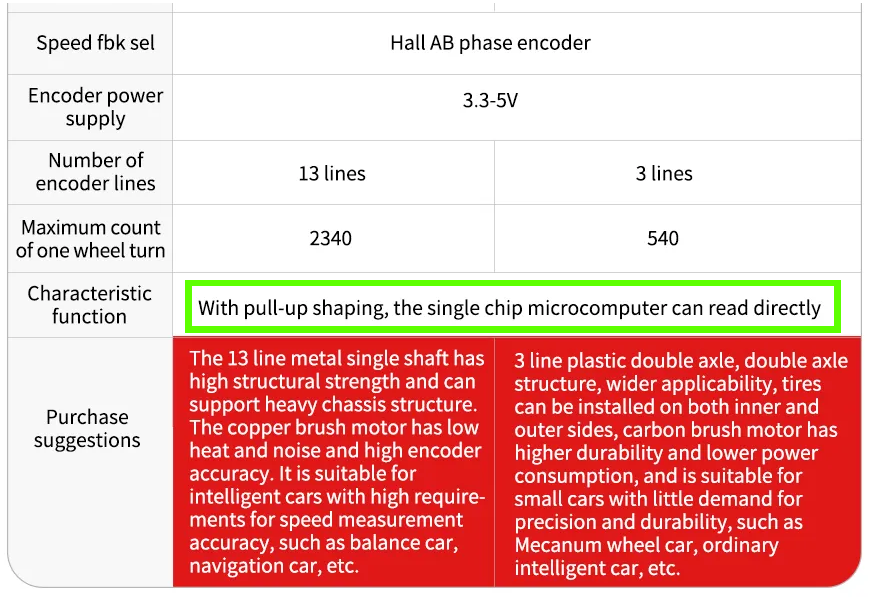
Ultimately I ended up using some motors from DFRobot instead. Sometimes sensors that are well documented are worth the extra money cause they will save you a lot of time.
These motors at a full stalled-out load can draw up to 2.8A each so I definitely will have to be careful because 5.6A of draw will take me over my limit. I’m going to hope that I will at most be using half the full load at all time so a total of 2.8 amps bringing me to a total of 5.8A used so far with 2.2A remaining. I’m hoping the motors will never be fully stalled out as if even if it bot hits a wall the wheels will simply just spint out.
To drive the motors I used a TB6612 which will let me set the motor direction using 3.3-volt logic and PWM to set my motor speed. This controller can handle 3A of peak loads per motor, so if my motors stall out for too long it could possibly burn out. I could send these using my Nano but instead, I will opt for using a microcontroller/embedded system.
Choosing an embedded system
Though the Jetson Nano has plenty of GPIO for reading values from all kinds of sensors, it simply will not suffice to read my sensors fast enough. In general, I’m a firm believer that sensors should be read using a real-time embedded system and should communicate with the main computer using a protocol such as serial or CAN bus. I’ll go over this in more detail in my next post. My philosophy is to let the embedded system deal with data at rates as high as 100 times a second (100hz) and communicate this data to the main computer on a request basis, thus freeing up computing on the main computer.
As a member of the Teensy gang I easily decided to use my Teensy 4.0 as it’s way more powerful than an Arduino and supports CAN bus. The Teensy will only draw about 100mA as well bringing my current draw to 5.9A
Unfortunately, the Jetson Nano does not support CAN bus (though almost all newer models do). I chose to get a USB2CAN-Module which works great as a plug-and-play solution on Linux. No drivers are required.
Cameras
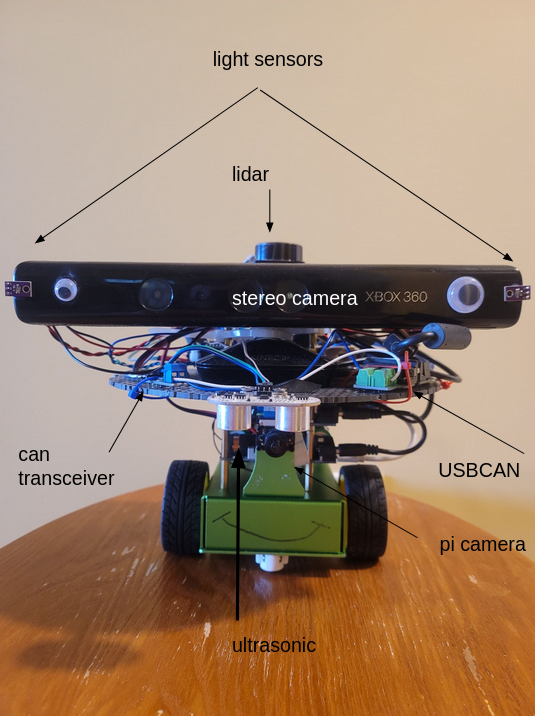
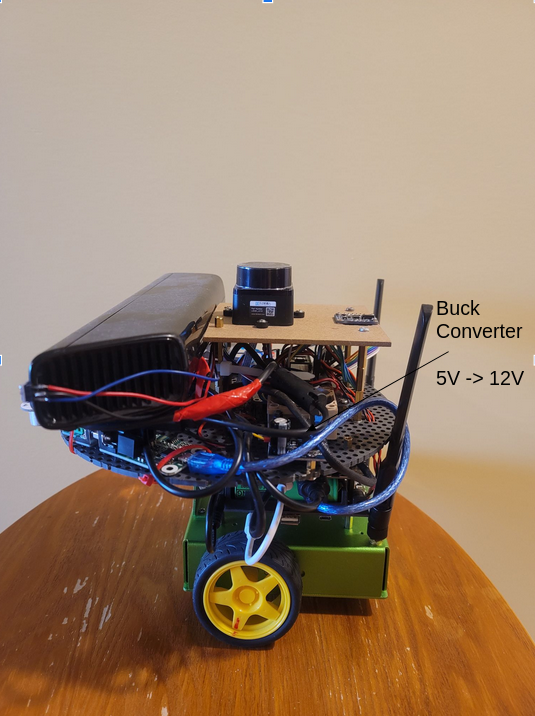
On top of the regular Raspberry Pi camera I wanted a stereo camera for better obstacle detection and for improving SLAM. To save money I used a $15 Xbox 360 Kinect. Since it’s typically powered using a proprietary port I had to buy a USB adaptor and a buck converter to up one of my 5V rails to 12V to power it. The Kinect should only require 1A bringing my total max current draw to 6.9A, nice.
Extra Sensors / Hardware
I maybe got a little carried away but if I had a sensor I wasn’t using and room for it on the robot I threw it on. Extra sensors include:
- 2x light sensors (so I could make it a Braitenberg Bot)
- 1x BNO055 - 9 DOF IMU sensor (for filtering motion and accurate heading estimation) (12.3 mA)
- 1x LDROBOT D300 - Lidar (will be useful for doing slam in the future) (180 mA)
- 3x Ultrasonic Sensors (will point down to detect edges/cliffs)
- 1x SN65HVD230 Can Transceiver (let’s me use CAN bus on Teensy)
All of these sensors bring my total current draw to ~7.2A so everything should be good to go! I forgot to mention I had to add a 5V to 3.3V logic converter for my motors as well since the encoders operated at 5V and my teensy reads at 3.3V.
Soldering it all together
Since I had no real concrete plan for this I mainly just soldered things onto a solderable bread board as I needed. As I soldered I loosely inspected using a voltmeter ensuring lines were shorted where they should be and nowhere else. As a safety precaution I crimped some connectors to the 5V rail so I can easily disconnect the power without ever accidently shorting something. Overall I jut made sure if I soldered something permently I could still access everything on the bot and fully dissassemble if needed. As my robotic tower of babel grew I kept adding layers usings standoffs, scraps laying around, and cardboard board from the dollar store. Hoestly putting everything together and soldering everything is always my most favourite part, but here it is!
On a final closing note, I really love Jekyll static pages, but the setup has always been an absolute nuisance. I found this new docker-compose container that just works great, docker-compose up, and I’m done. Slowly, Docker is becoming the solution to all my problems, rather than my cause…